Image Communications Logo


COMPUSAT SUPPORT INFORMATION

Loading a New Factory Satellite Database


CompuSat Logo


Please read the following instructions before upgrading your factory database.

The satellite name check performed at the conclusion of the CompuSat database update is crucial for CompuSat to operate properly.

The satellite names stored in your Site Configuration must match the named in the updated satellite database, which means that when satellites in the factory database are renamed, they must also be renamed in the the configuration.


Installing Your New Database

To install a new factory database in your CompuSat system, follow these steps:

1. Backup your CompuSat directory
2. Download the latest database from the CompuSat site
3. Load the downloaded database into CompuSat
4. Perform the satellite name check. DO NOT SKIP THIS STEP!


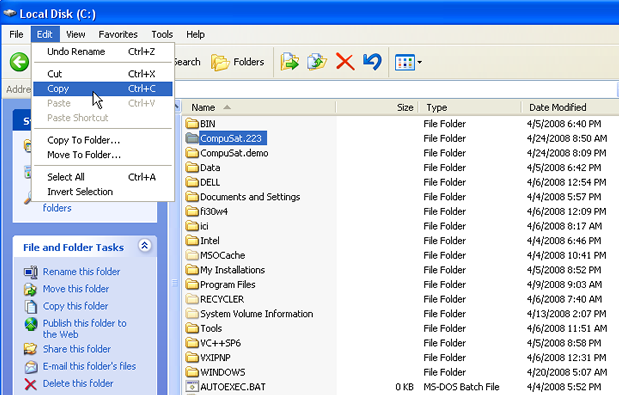
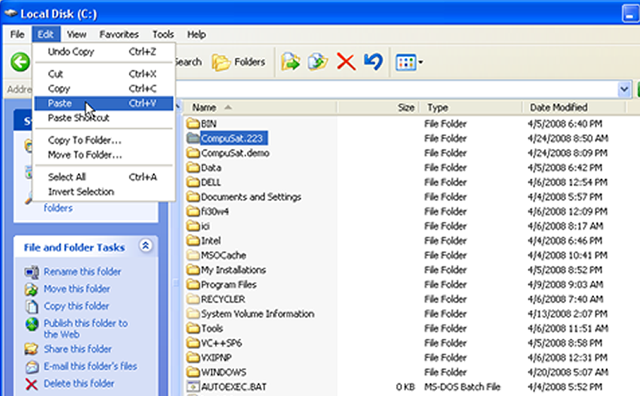
1. Backup your CompuSat directory

Backup your current CompuSat data before proceeding:

a.

Open the My Computer folder on your PC.

b.

Double-click your C-drive

c.

Highlight the current CompuSat directory.

For almost all customers, this is the CompuSat.XXX file with the highest numeric value for XXX. For example, CompuSat.302 would be a more recent directory than CompuSat.301 or CompuSat.250.

d.

Click Edit|Copy to copy the directory onto the Windows clipboard.

Copy database file to clipboard

e.

Click Edit|Paste to paste the directory from the clipboard, creating a new directory named Copy of CompuSat.XXX.

Paste backup copy


2. Download the latest satellite database

a.

Download the new database from the CompuSat FTP site. You can always find the latest database at www.compusat.com/supportSatDb.html. You need your user ID and password to access the file.

b.

The database file you download has the .exe suffix; for example AprMay08b.exe. This is is a self-extracting ZIP file.

c.

Double-click the file to extract the database files to your current CompuSat directory.


NOTE: the four extracted database files must reside in your current CompuSat directory.


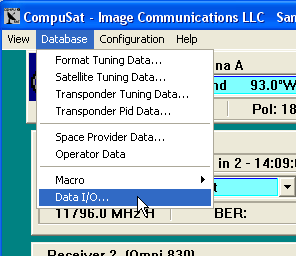
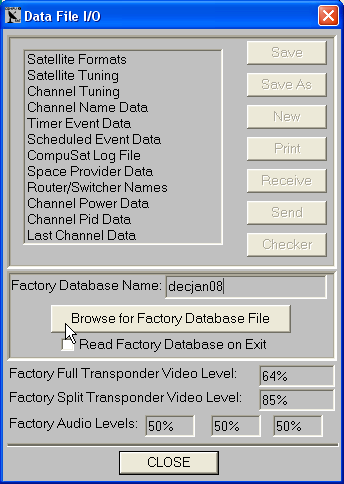
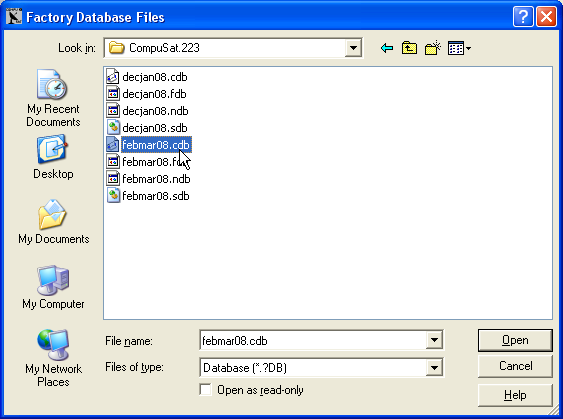
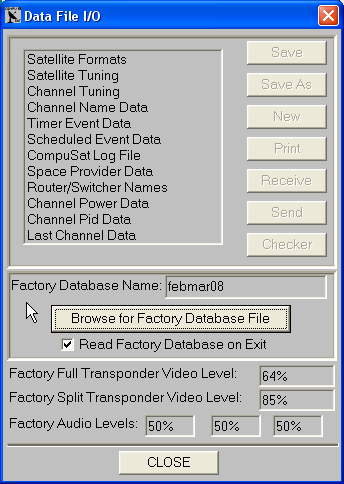
3. Load the new database into CompuSat
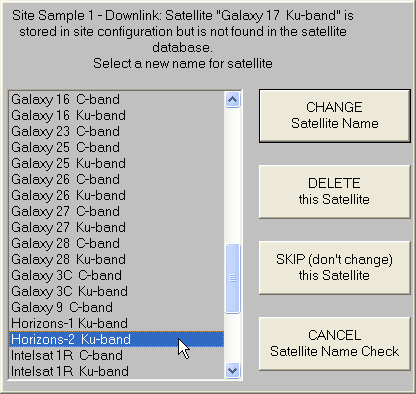
a.

Select the Data I/O command from CompuSat's Database menu:

Goto Data I/O


b.


CompuSat displays the Data File I/O screen, with the name of the factory database that you have been using.

Data I/O Dialog

c.

Click the Browse for Factory Database File button to select the newly downloaded factory database file.

d.

CompuSat displays the Open File screen, with the name of the current directory shown in the Look in: field at the top. Make certain that the current directory is the directory to which you installed your newly downloaded database (in step 2).

Lookin Dialog

e.


Select any one of the four new database files (files ending with .FDB .SDB, .NDB, or .CDB) and click the Open button.


Note: CompuSat cannot read a database directly from a CD; the files MUST reside in the current CompuSat directory.


f.


Perform the satellite database check.


4. Satellite Database Check


The Data File I/O screen should now show the name of the database file that you just downloaded.

Data I/O Dialog

Note that the Read Factory Database on Exit checkbox is selected.

b.

Click the CLOSE button to close the Data I|O Screen and read the new database.

CompuSat checks the antenna satellite positions in your site configuration against the satellite positions in the new database, verifying that each satellite (on each dish) in your configuration is still in the database.

c.

If your configuration references a satellite name that's not in the new database, CompuSat allows you to choose how to update your configuration:

Select New Satellite Name

In this example, the CompuSat site configuration includes antenna pointing data for satellite Galaxy 17 Ku-band, which doesn't exist in the new database because Horizons-2 has replaced it.

You can choose from among these actions to address this:


Click CHANGE Satellite Name to have CompuSat substitute the highlighted name (e.g. Horizons-2) for the obsolete name (Galaxy 17 Ku-band) throughout your configuration.


If the satellite has been taken out of service, click Delete this Satellite. CompuSat removes the satellite name and pointing data from your Antenna List configuration.


If you want to cancel satellite name updates and preserve all of your antenna position configuration information, click CANCEL Satellite Name Check.


Trouble-Shooting

If something goes wrong with reading the factory database, then CompuSat will shown an empty or almost empty list of satellite names when prompting you for changes in the Satellite Database Check. In fact, the list of names only shows the names of any satellites defined in your custom database.

This happens because your downloaded database files are not in the same directory as the CompuSat program file, SatrackL.exe.

You should also verify that you're running CompuSat from the intended directory:

1.

Right-click the CompuSat icon on your desktop, and select Properties.

2.

Click the Shortcut tab.

3.

Verify that the Target directory is the correct one.

4.

Verify that the Start In directory is either blank, or is the same as the Target directory.


Software Updates

If you want a software update to the latest revision please email andys@compusat.com with your request.  Be sure to include your current version an email address to receive the updates.


Any questions? Call Image Communications, LLC @941-322-2534

Contact Us Copyright © 1991-2008   Image Communications, LLC Image Communications, LLC